
Starlink: A Review and Some Hacks

I could probably be described as a SpaceX enthusiast. I catch their launches when I can, and I’ve watched the development of Starship with great interest. But the side-effect of SpaceX’s reusable launch system is that getting to space has become a lot cheaper. Having excess launch capacity means that space projects that were previously infeasible become suddenly at least plausible. One of those is Starlink.
Starlink is SpaceX’s satellite Internet service. Wireless and cellular internet have helped in some places, but if you really live out in the sticks, satellite internet is your only option. And while satellite Internet isn’t exactly new, Starlink is a bit different. Hughesnet, another provider, has a handful of satellites in geostationary orbit, which is about 22,000 miles above the earth. To quote Grace Hopper, holding a nearly foot-long length of wire representing a nanosecond, “Between here and the satellite, there are a very large number nanoseconds.”
SpaceX opted to do something a bit different. In what seemed like an insane pipe dream at the time, they planned to launch a satellite constellation of 12,000 birds, some of them flying as low as 214 mile altitude. The downside of flying so low is that they won’t stay in orbit as long, but SpaceX is launching them significantly faster than they’re coming down. So far, nearly 1,600 Starlink satellites are in orbit, in a criss-crossing pattern at 240 miles (550 km) up.
This hundred-fold difference in altitude matters. A Hughesnet connection has a minimum theoretical latency of 480 ms, and in reality runs closer to 600 ms. Starlink predicts a theoretical minimum of under 10 ms, though real-world performance isn’t quite that low yet. In the few weeks I’ve had the service, ping times have fallen from mid-60s down to 20s and 30s. The way Starlink works right now, data goes up to the closest satellite and directly back to the connected ground station. The long-term plan is to allow the satellites to talk directly to each other over laser links, skipping over the ground stations. Since the speed of light is higher in a vacuum than in a fiber-optic cable, the fully deployed system could potentially have lower latency than even fiber Internet, depending on the location of the endpoint and how many hops need to be made.
I got a Starlink setup, and have been trying out the beta service. Here’s my experience, and a bonus hack to boot.
The Hardware
In the box, you get a router, a PoE injector, a simple tripod, and “Dishy McFlatface” — the innovative satellite dish with a permanently attacked 100-ft Ethernet cable. The router itself is uninteresting, and has an initial setup page to configure the WiFi, and no further configurations. Of great interest to me, however, is the fact that the router reports itself to be an OpenWRT device. Taking the case apart was quite a pain, as the seams are tight, and the clips are recessed a bit. Once you’ve made it in, however, there is a header that is likely a serial port.
The PoE brick is very interesting. It has two outputs. One supplies the router low power, but the other port supplies the satellite dish with 56 V at 1.6 A x 2. For those following along at home, that’s just under 180 watts of power down a Cat5e cable. I’ve not yet found any other PoE implementations that push that much power, so it seems that we’re limited to using the supplied power supply for Dishy.
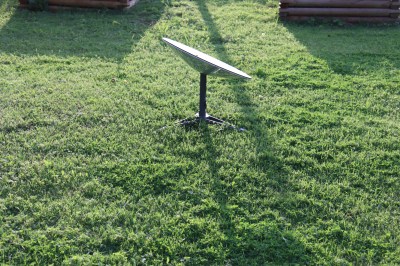
The dish itself is motorized and automatic. There’s none of the fiddly manual pointing that other dishes require. Dishy determines its location and orientation on boot, and automatically points itself in the proper direction. From there, the phased array antenna steers the beam to precisely target the overflying satellites.
The biggest issue to wrestle with is avoiding obstructions. Dishy needs a clear view of the sky, and the EHF frequency in use is very sensitive to physical barriers. Tree leaves are enough to completely block the signal. Because the system talks to satellites that are continually moving, the window of sky that needs to be clear is quite wide. Some optimizations have been added recently to be more fault tolerant of obstructions, like an automated fail-over to a secondary satellite when the preferred endpoint is unavailable. The system may eventually be robust enough to work well with obstructions, but for now, obstructions still means service interruptions, so setting the dish in the open is critical.
The Real World Performance
It’s not Gigabit fiber, but I’m regularly getting 200 Mbps down and 15 Mbps up. Ping times are low enough that latency isn’t a noticeable problem.
That’s not to say that there aren’t any problems. There are three main annoyances. The first is the drop-outs. According to the built-in statistics page, gaps in the satellite coverage has resulted in five minutes of downtime over the last 24 hours, with an additional two minutes of miscellaneous downtime: two nines.
It doesn’t sound like much, but these drop-outs are spread out over a few seconds here and there, and it is irritating. A second problem, ironically, is updates. During the beta period, updates are automatically installed, resulting in unpredictable disconnects.
The last irritation to mention is that IPv4 connectivity is provided using Carrier Grade NAT (CGNAT). I’m currently assigned 100.82.35.212, which is part of the address space specifically set aside for CGNAT. The important bit is that it’s not a routable address. I wondered if Starlink would route between these addresses, from one Starlink connection to another, but in my testing those packets were blocked.
— google.com ping statistics —
100 packets transmitted, 100 received, 0% packet loss, time 99130ms
rtt min/avg/max/mdev = 17.801/27.748/44.228/5.769 ms
Still, ping times are getting better and dropouts are getting fewer and further between as more satellites are launched. The firmware updates will likely be more controllable once the Beta period is over. And while Starlink doesn’t hand out a routable IPv4, it does assign an IPv6 prefix, if you have a router that supports it. They don’t yet support handing out static IPv4 addresses or IPv6 prefixes, but it sounds like this is a feature they plan to eventually support.
Speaking of eventual support, you should know that Starlink is geolocked. They’ve divided the world into cells approximately 15 miles across, and they’re turning on support for them one at a time. You register for Starlink at your home address, and your Dishy is assigned to the associated cell. You can pick up and move, but if you go outside that cell, your connection won’t work. For now, all it takes is a change of your service address to get things working again. Elon has publicly committed to making it fully mobile, up to and including staying connected while in motion.
Yeah, should be fully mobile later this year, so you can move it anywhere or use it on an RV or truck in motion. We need a few more satellite launches to achieve compete coverage & some key software upgrades.
— Elon Musk (@elonmusk) April 15, 2021
Hacks
So what kind of Hackaday review would this be without some clever hack to make Starlink more useful? My existing cable internet is actually pretty decent: the speeds are good, and the latency is quite low. The biggest annoyance is that it was IPv4 only. Starlink has great speed, slightly worse latency, and no routable IPv4 addresses, only IPv6. Oddly enough that makes it the perfect compliment to cable.
The interesting thing about having IPv4 and IPv6 on the same network is that the addressing and routing are completely separate from each other. Or to put it another way, there’s no reason that your IPv4 gateway has to be the same device as your IPv6 gateway.
To achieve this, I plugged Dishy in to my existing OpenWRT router as a second WAN device. I had to enable an IPv4 DHCP interface for IPv6 DHCP to work, and I noticed an option in the OpenWRT interface: “Use default gateway. If unchecked, no default route is configured.” That setting, and the couple of other switches to turn IPv6 support back on, and I suddenly had IPv4 internet provided by my cable company, and IPv6 provided by Starlink.
I don’t know if you’ve ever looked into balancing your network across two internet connections, but it’s a decidedly non-trivial problem. Doing a fail-over is easy by comparison — you simply detect when one connection is down, and make sure your default route goes through the other one. Trying to use both at once is harder, because the router has to track connections, and keep the different connections going down the right pipes. Complex web services can consist of multiple connections, and there can be problems if the service sees you coming from different IPs. By splitting IPv4 and IPv6, you get balancing for free because only some services are IPv6 enabled. You also get limited failover because much of the internet is built to try IPv6, and fall back to IPv4.

As I mentioned it in the beginning, there is what looks like a test point in the router, with a missing SMD resistor. It’s very likely that there is a serial port to be found here. Hopefully we’ll see a future hack where we can add the resistor and header, and get into the router. If you recognize exactly what connector fits there, let us know.
One more DIY trick you should know is that the supplied cable is a Cat5e outdoor rated FTP (Foil Twisted Pair) cable, with 24 AWG conductors. That’s pretty standard stuff for outdoors rated Ethernet.
What does this mean? You can make a portable installation by simply cutting the 100 ft cable down to a convenient length, and terminating it yourself. Run either the original cable, or another outdoor rated cable, and throw a grounded jack on the end. Put it in a waterproof enclosure, and you now have a portable solution. Ready to hit the road? Just unplug Dishy and you’re ready to go, as long as you stay within your cell. It’s not perfect yet, but Starlink is getting better as time goes by. From my perspective, at least, the future is bright. Now all I need is to build a cabin somewhere in the mountains, and my digitally connected hideaway dreams will be realized.


Post a Comment