New Part Day: Onion Tau LiDAR Camera
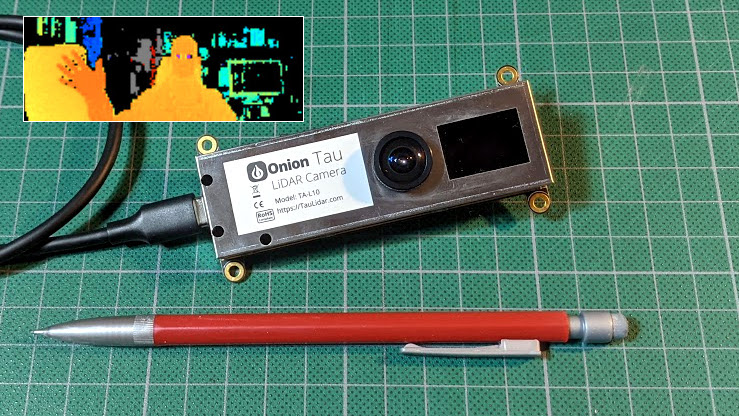
The Onion Tau LiDAR Camera is a small, time-of-flight (ToF) based depth-sensing camera that looks and works a little like a USB webcam, but with a really big difference: frames from the Tau include 160 x 60 “pixels” of depth information as well as greyscale. This data is easily accessed via a Python API, and example scripts make it easy to get up and running quickly. The goal is to be an affordable and easy to use option for projects that could benefit from depth sensing.
When the Tau was announced on Crowd Supply, I immediately placed a pre-order for about $180. Since then, the folks at Onion were kind enough to send me a pre-production unit, and I’ve been playing around with the device to get an idea of how it acts, and to build an idea of what kind of projects it would be a good fit for. Here is what I’ve learned so far.
What Does It Do?
The easiest way to visualize what the camera does is by using the example applications, starting with Tau Studio. It is a web app that runs locally and can be viewed in any browser, and shows a live depth map and 3D point cloud generated by the attached camera.
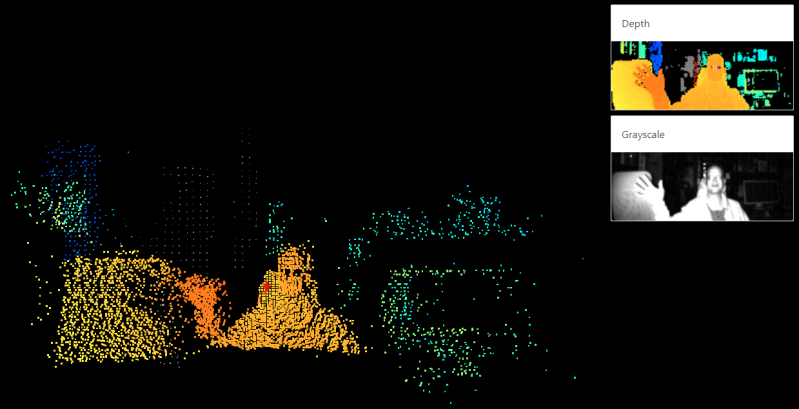
Tau Studio (and particularly the point cloud generation) works best in room-scale applications. The point cloud gets weird if things get too close to the camera, but more on that in a bit.
What’s It For?
The 3D depth data generated by the Tau camera lets a project make decisions that are based on distance measurements in real-world spaces. The way that works is each depth frame from the camera can be thought of as an array of 160 x 60 depth measurements representing the camera’s view, but it can provide additional data as well.
A bit of Python is all it takes to request things like depth info, a color depth map, or a greyscale image. Frames are also almost trivial to convert into OpenCV Mat objects, meaning that they can be easily passed to OpenCV operations like blob detection, edge detection, and so forth. The hardware and API even support the ability to plug in and use more than one camera at the same time, configured so they do not interfere with one another.
Device and Setup
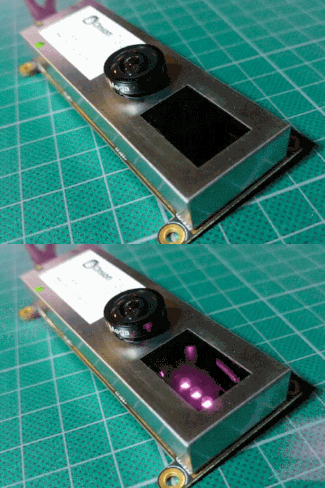
The Onion Tau is fairly small, with four M3-sized mounting holes and flat sides that make it easy to mount or enclose, and a single USB-C connector. It has a single lens, and next to the lens is a dark rectangular window through which IR emitters blink while the camera is in operation. Be sure to leave that area uncovered, or it won’t work properly.
Both power and data are handled via the USB-C connector, and a short cable is included with the camera. I found that a longer cable was extremely useful during the early stages of playing with the hardware. I used a high quality 5 meter long USB 3.0 active extender cable, which seemed to work fine. During early use, I was moving the camera around in all sorts of ways while running example code on my desktop machine and watching the results. It was a lifesaver because it allowed me to freely move the camera around while experimenting.
There’s a good getting started guide that walks through everything needed to get up and running, but to get a good working knowledge of what the camera is (and isn’t) good at, it’s worth going a bit further than what that guide spells out.
Testing and Building Familiarity
If I had one piece of advice for people playing around with the Tau to see what it does and doesn’t do well, it would be this: do not stop after using Tau Studio. Tau Studio is a nice interactive demo, but it does not give the fullest idea of what the camera can do.
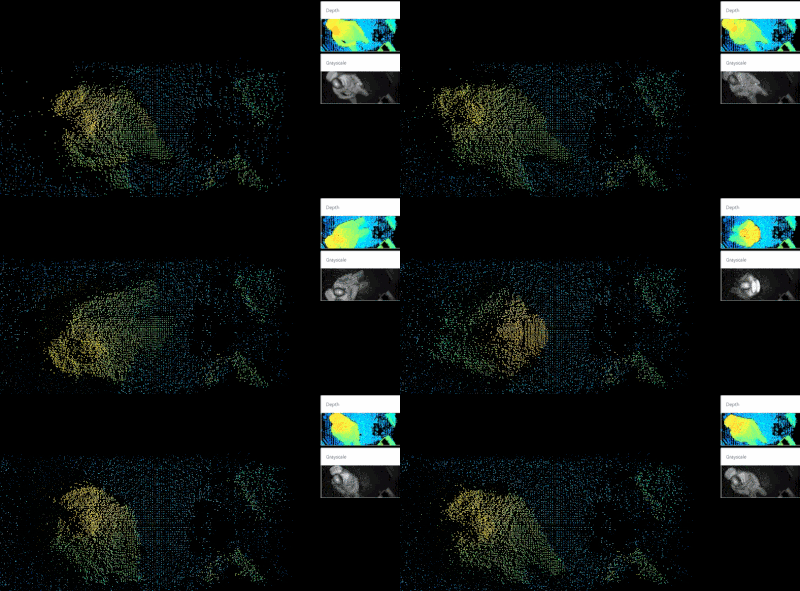
Here is an example of what I mean: the point cloud in the image below turns into a red, hourglass-shaped mess if something is too close to the camera. But that doesn’t mean the camera’s data is garbage. If one watches the Depth window (top right from the point cloud), it’s clear the camera is picking up data far better than the distorted point cloud would imply.
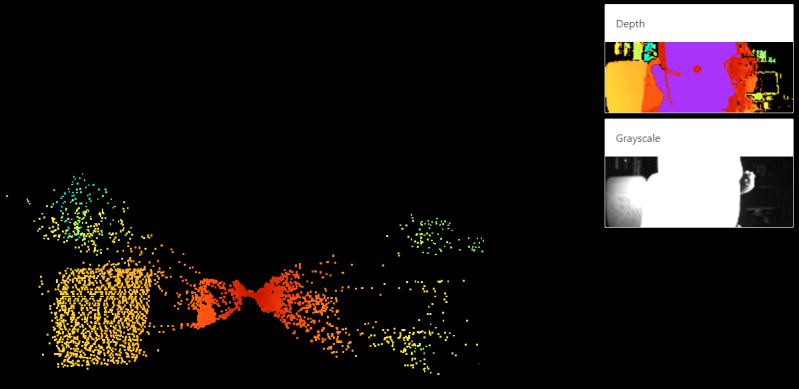
This is why it is important to not limit oneself to looking at the point cloud to decide what it is that the camera can and cannot do. The 3D point cloud is neat for sure, but the Depth view gives a better idea of what the camera can actually sense.
To get the fullest idea of the camera’s abilities, be sure to run the other examples and play with the configuration settings within. I found the distance.py and distancePlusAmplitude.py examples particularly helpful, and playing around with changing the values for setIntegrationTime3d (a bit like an exposure setting), setMinimalAmplitude (higher values filter out things reflecting less light), and setRange (adjusts the color range in the depth map) were the most instructive. The GitHub repository has the example code, and documentation for the API is available here.
In general, the higher the integration time, the better the camera senses depth and deals with less-cooperative objects. But if objects are getting saturated with IR (represented by purple in the depth map), reducing integration time might be a good idea. The amplitude view is a visual representation of how much reflected light is being picked up by the sensor, and is a handy way to quickly evaluate a scene. A higher minimal amplitude setting tends to filter out smaller and more distant objects.
What The Tau is Best At
The Tau seems to work best at what I’ll call “arm’s length and room-scale” operations, by which I mean the sweet spot is room-sized areas and ranges, with nothing getting too close to the camera itself. For this kind of operation, the default settings for the camera work very well.
The camera does not deal with very small objects at close ranges without tweaks to the settings, and even then, chasing results can feel a bit like fitting a square peg into a round hole. For example, I was not able to get the Tau to reliably detect things like board game pieces on a tabletop, but it did do a great job of sensing the layout of my workshop.
Mounting the Tau onto the ceiling and looking down into the room, for example, gave glorious results and could easily and reliably detect people, objects, and activity within the room.
Reflective objects (metal tins and glossy printed cardboard in my testing) could be a bit unpredictable, but only at close ranges. In general, the depth sensing was not easily confused as long as things weren’t too close to the camera. For optimal results, it’s best to keep the camera at arm’s length (or further) from whatever it’s looking at.
An Affordable Depth Camera, With Python API
The Tau is small, easily mountable, and can be thought of as a greyscale camera that also provides frames composed of 160 x 60 depth measurements. A bit of Python code is all it takes to get simple frame data from the camera, and those frames are almost trivial to convert into OpenCV Mat objects for use in vision processing functions. It works best at arms-length and room-scale applications, but it’s possible to tweak settings enough to get decent results in some edge cases.
The Python example applications are simple and effective, and I want to reiterate the importance of playing with each of them to get a fuller idea of what the camera does and does not do. Tau Studio, with its colorful 3D-rendered point cloud, is a nice tool but is in some ways very narrow in what it does. Watching the point cloud doesn’t paint the most complete picture of what the camera does, and how it can be configured, so be sure to try all the examples when evaluating.
Post a Comment