Getting Started With FreeRTOS And ChibiOS

If operating systems weren’t so useful, we would not be running them on every single of our desktop systems. In the same vein, embedded operating systems provide similar functionality as these desktop OSes, while targeting a more specialized market. Some of these are adapted versions of desktop OSes (e.g. Yocto Linux), whereas others are built up from the ground up for embedded applications, like VxWorks and QNX. Few of those OSes can run on a microcontroller (MCU), however. When you need to run an OS on something like an 8-bit AVR or 32-bit Cortex-M MCU, you need something smaller.
Something like ChibiOS (‘Chibi’ meaning ‘small’ in Japanese), or FreeRTOS (here no points for originality). Perhaps more accurately, FreeRTOS could be summarized as a multi-threading framework targeting low-powered systems, whereas ChibiOS is more of a full-featured OS, including a hardware abstraction layer (HAL) and other niceties.
In this article we’ll take a more in-depth look at these two OSes, to see what benefits they bring.
Basic feature set
FreeRTOS supports a few dozen microcontroller platforms, the most noticeable probably being AVR, x86 and ARM (Cortex-M & Cortex-A). In contrast, ChibiOS/RT runs on perhaps fewer platforms, but comes with a HAL that abstracts away hardware devices including I2C, CAN, ADC, RTC, SPI and USB peripherals. Both of them offer a preemptive multi-tasking scheduler with priority levels and multi-threading primitives, including mutexes, condition variables and semaphores.
The corollary of this comparison then seems to be that FreeRTOS is good for basic multi-threading features, whereas ChibiOS/RT offers a more holistic approach through its HAL. The presence of the HAL also means that one can theoretically target ChibiOS/RT and recompile the same code for different MCU platforms. For FreeRTOS one would still have to use another framework to use hardware peripherals, whether this would be CMSIS, ST’s HAL or something else, and this decreases portability.
In the next sections we’ll be working through a basic example for each of these two OSes, to gain a deeper understanding of what developing with them is like.
FreeRTOS with CMSIS-RTOS

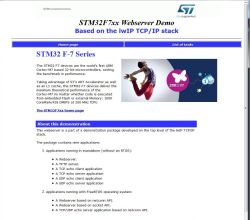
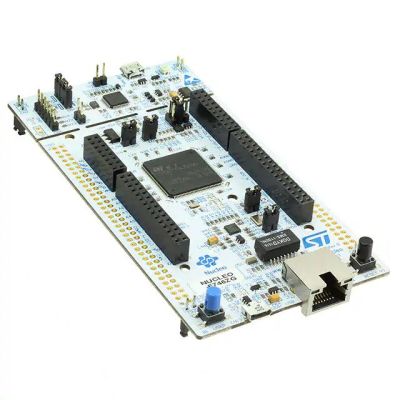
For a simple example of how to work with FreeRTOS, the HTTP server example by ST for the Nucleo-746ZG STM32 development board is a good start. I have also made a self-contained version with all dependencies and a Makefile for use with the Arm Cortex-M GCC toolchain.
This example project demonstrates how to combine the CMSIS-RTOS API, FreeRTOS and the LwIP networking stack to create a Netconn-based HTTP server which can serve documents and images. The Netconn API of LwIP is a higher-level API than the raw API, which makes it the preferred choice if one has no special needs when it comes to networking.
The entry point of the demo project is found in Core/Src/Main.cpp. Its purpose is mostly to set up the firmware: configure peripherals and clocks, then initialize the first threads. Here we see not the syntax for FreeRTOS threads (tasks) being used, but that of CMSIS-RTOS, e.g.:
osThreadDef(Start, StartThread, osPriorityNormal, 0, configMINIMAL_STACK_SIZE * 5);
osThreadCreate (osThread(Start), NULL);

static void StartThread(void const * argument)
{
    /* .. */
}
CMSIS-RTOS is part of the Cortex Microcontroller Software Interface Standard, or CMSIS for short. It is a vendor-independent hardware abstraction layer (HAL) for Arm Cortex-based MCUs. In the case of embedded RTOSes, CMSIS provides the CMSIS-RTOS specification, which allows software to be written for a generic RTOS API and thus made portable across Cortex-M (and Cortex-A). Each supported RTOS then provides a CMSIS-RTOS implementation that maps the two sets of API calls.
In this example we are using the more basic CMSIS-RTOS v1 API with FreeRTOS. For newer MCUs with ARMv8 support as well as multi-core and Cortex-A, the RTOS v2 interface is a better match. The RTOS v2 interface is also supported by FreeRTOS, and the necessary files for this are found under Middlewares/Third_Party/FreeRTOS/Source/CMSIS_RTOS_V2, next to the folder with files for RTOS v1.
In the code snippet from earlier we saw how a new thread gets created. At the moment when we created the Start thread, there was however no scheduler running yet. We start this with a call to osKernelStart(). After this the code in the startThread function is scheduled and executed. Not surprisingly, this function starts the main threads which will form our HTTP server:
static void StartThread(void const * argument)
{
  /* Create tcp_ip stack thread */
  tcpip_init(NULL, NULL);

  /* Initialize the LwIP stack */
  Netif_Config();

  /* Initialize webserver demo */
  http_server_netconn_init();

  /* Notify user about the network interface config */
  User_notification(&gnetif);

#ifdef USE_DHCP
  /* Start DHCPClient */
  osThreadDef(DHCP, DHCP_thread, osPriorityBelowNormal, 0, configMINIMAL_STACK_SIZE * 2);
  osThreadCreate (osThread(DHCP), &gnetif);
#endif

  for( ;; )
  {
    /* Delete the Init Thread */
    osThreadTerminate(NULL);
  }
}
We first call tcpip_init(), which creates the LwIP TCP/IP processing thread (tcpip_thread). Netif_Config() is the network interface configuration function in our code. It calls the LwIP NETIF functions netif_add() and netif_default() to add and set our new network interface as the default. With this, we have LwIP fully
The http_server_netconn_init() function is found in httpserver-netconn.c. It creates a new thread called HTTP, which runs the code in http_server_netconn_thread. This sets up the server socket on port 80 and waits for new incoming connections. These are then handled by the http_server_serve() function, which is a simple if/else block for parsing HTTP requests and serving either the static file content (hard-coded in byte arrays), or showing the dynamic information (for a /STM32F7xxTASKS.html request) generated by DynWebPage():
void DynWebPage(struct netconn *conn)
{
  portCHAR PAGE_BODY[512];
  portCHAR pagehits[10] = {0};

  memset(PAGE_BODY, 0,512);

  /* Update the hit count */
  nPageHits++;
  sprintf(pagehits, "%d", (int)nPageHits);
  strcat(PAGE_BODY, pagehits);
  strcat((char *)PAGE_BODY, "


<pre>
Name          State  Priority  Stack   Num" );
  strcat((char *)PAGE_BODY, "
---------------------------------------------
");

  /* The list of tasks and their status */
  osThreadList((unsigned char *)(PAGE_BODY + strlen(PAGE_BODY)));
  strcat((char *)PAGE_BODY, "

---------------------------------------------");
  strcat((char *)PAGE_BODY, "
B : Blocked, R : Ready, D : Deleted, S : Suspended
");

  /* Send the dynamically generated page */
  netconn_write(conn, PAGE_START, strlen((char*)PAGE_START), NETCONN_COPY);
  netconn_write(conn, PAGE_BODY, strlen(PAGE_BODY), NETCONN_COPY);
}
The interesting part about this function is that it gives an insight in the active threads, as obtained from a call to osThreadList(). Although not an official part of the v1 CMSIS-RTOS API, it does provide useful functionality. This does however show that although the CMSIS-RTOS HAL is useful, it is imperfect and may not by default cover more exotic use cases, or fail to expose APIs from the underlying OS.

That aside for now, the rest of the StartThread() function holds few surprises: the User_notification() function (found in app_ethernet.c) sets the LEDs on the Nucleo development board to indicate the connection status. If we have enabled DHCP support, a thread is created for this as well, using DHCP_thread() from that same source file. The DHCP thread tries to obtain an IP address using the DHCP functionality in LwIP and set this for the interface which we created earlier.
At this point we can compile the project. Assuming we have obtained the arm-none-eabi GCC toolchain via the Arm download page or via our operating system’s package manager so that the compiler is on the system path, compiling the Makefile-based project can be done with a simple call to make. Flashing to a Nucleo-746ZG development board requires that OpenOCD is installed, after which a simple make flash with the board connected suffices.
Chibi: Perhaps not so small

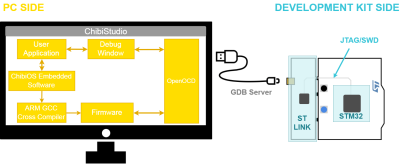
As alluded to earlier, ChibiOS is (ironically) a lot larger than FreeRTOS in terms of its feature set. This becomes also apparent when it comes to simply getting started with a new ChibiOS project. Whereas FreeRTOS as we saw earlier can comfortably be just the RTOS within a HAL like CMSIS-RTOS, ChibiOS has a lot of functionality which is not covered by that API. For this reason, the ChibiOS project has its own (Eclipse-based) IDE in the form of ChibiStudio, which comes with demo projects preinstalled.
On the website Play Embedded, a large number of tutorials and articles on ChibiOS can be found, such as this introduction article, which also covers getting started with ChibiStudio. ChibiOS’s complexity also shows in the configuration files, which include:
chconf.h, for configuring kernel options.halconf.h, for configuring the HAL.mcuconf.h, containing information pertaining to the specific MCU that is being targeted.
The ‘Blinky’ example project as provided with the ChibiOS download package for the STM32F042K6 MCU (as found on the ST Nucleo-F042K6 board) gives a pretty solid overview of what a ChibiOS project looks like. Of note here is the use of the ChibiOS/HAL module, which allows for the use of the UART2 peripheral, using ChibiOS’s serial driver.
Retargeting the code to another MCU should be a matter of updating the configuration files and recompiling, though one gets the impression that this is meant to be done via the IDE, and not so much by hand. The integration with other IDEs does not appear to be a thing either, from a cursory look. This would likely mean becoming very cozy with the Doxygen-generated documentation and other information out there.
At the same time, ChibiOS does support CMSIS-RTOS, and also offers two different kernels: the RT (real-time) one, and NIL, which is basically just trying to be as small as possible in terms of code size. This trade-off doesn’t appear to affect performance too much if their benchmarks are to be believed, making it an interesting option for a new embedded (RT)OS project.
Wrapping up
In this article we had a look at some of the things which one will encounter when deciding to develop using either FreeRTOS or ChibiOS. While both have their strong and weak points, the main point which one should take away is that they’re two very different beasts when it comes down to it. Both in the features which they provide, and the needs they target.
If one already uses CMSIS, then slotting in FreeRTOS is simple and straight-forward, allowing one to use other CMSIS-targeting code out there with few if any changes. ChibiOS on the other hand is more its own thing, which isn’t necessary a negative. Maybe it’s most helpful to look at FreeRTOS as a helpful module one can bolt onto CMSIS and other frameworks to add multi-threading support, whereas ChibiOS is more akin to NuttX and Zephyr, as a one-stop solution for all your needs.
Post a Comment